
I was searching for inexpensive RTC what to use with my Raspberry Pi to get correct time when I have no network connectivity. As I want to run MySQL database on my offline RPi I would like to have more or less precise clock.
I had two requirements:
- It should be more precise than RTC based on DS1307Z which I had used earlier and which drifted several minutes in one day. Drifting was not the chip issue as it required external crystal oscillator but I don’t have time to check all available crystals with that chip. I just need clock to be more or less correct.
- It should plug in directly to RPi main GPIO header to eliminate annoying wires.
I found RTC based on DS3231SN chip which according to the manufacturer Maxim Integrated has internal crystal and is accurate ±2ppm in temperature range 0°C to +40°C and ±3.5ppm in temperature range of -40°C to +85°C. In human language it means that its precision is approximate between 1 and 2 minutes during one year in a temperate climate zones of the earth.
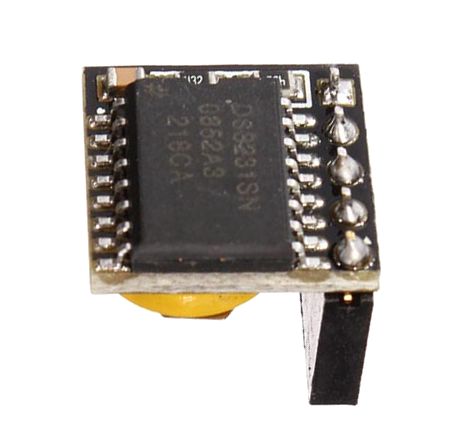
It supports same I2C bus as DS1307 so the setup is essentially the same.
It plugs into Raspberry Pi main header exactly to the same place on all RPi models so far (RPi 1 A,A+,B,B+, RPi 2 B) as shown on the picture below and uses pins 1,3,5,7,9.

There are few differences between older and newer Raspian Wheezy releases, so to get it working, choose what is closer for you. If one is not working for you, choose other option.
Configuring Raspbian Wheezy 2014-01-07
1. Edit /etc/modprobe.d/raspi-blacklist.conf and change line containing “blacklist i2c-bcm2708” to “# blacklist i2c-bcm2708” or just delete that line. Missing raspi-blacklist.conf file indicates that you chose wrong option.
2. load i2c module
# sudo modprobe i2c-bcm27083. “Create” new i2c device, note that if you are using RPi model A, change “i2c-1” to “i2c-0” in the command below.
# echo ds3231 0x68 | sudo tee /sys/class/i2c-adapter/i2c-1/new_device4. In order to do configure RTC on startup, add commands shown in steps 2 and 3 into /etc/rc.local file just before line containing “exit 0”! You can omit “sudo” when you put commands to rc.local.
That’s it, you are done! Sample commands and scripts for clock manipulation are in the end of this article.
Configuring Raspbian Wheezy 2015-02-16
1. Enable i2c interface and module loading using raspi-config (under advanced options) or add following line to the end of /boot/config.txt :
dtparam=i2c_arm=on2. Reboot with the really hard to guess command:
# sudo reboot3. “Create” new i2c device, note that if you are using RPi model A, change “i2c-1” to “i2c-0” in the command below.
# echo ds3231 0x68 | sudo tee /sys/class/i2c-adapter/i2c-1/new_device4. In order to do configure RTC on startup, add command shown step 3 into /etc/rc.local file just before line containing “exit 0”! You can omit “sudo” when you put commands to /etc/rc.local.
That’s it, you are done!
Manipulating the clock
1. Set timezone if you have not set it already. It can be done with raspi-config (under Internationalisation Options) or with dpkg command – choose one from below:
# sudo raspi-config
or
# sudo dpkg-reconfigure tzdata
2. Show/display hardware clock time. If you really don’t know how to display system time, run command “date”.
# sudo hwclock3. Read hardware clock time and set system time accordingly. Add this line to /etc/rc.local file to set system time each time you boot up. That’s of course only necessary if you don’t have internet connection available.
# sudo hwclock -s4. Write system time to hardware clock. Would be a good point if you have just synced the clock with internet time servers or after you updated system time manually.
# sudo hwclock -w5. Write custom time to hardware clock
# sudo hwclock --set --date="2015-04-01 00:00:00"Few notes about the ntp – what you can do if you have internet connection
1. Update clock via internet time servers manually. It does not work if you have ntp daemon already running. Note that although option “-g” in command below allows to update clock to any value (drift is not limited or restricted), it can be used just once (man ntpd).
# sudo ntpd -gq2. Sample script to do something only if ntpd has really synced the system time with internet time servers. Note that it probably takes about 15 minutes after startup before this script reports clock to be in sync, so be patient.
#!/bin/bash

# This script does nothing useful if clock is not in sync

# use ntp-wait to check if clock is in sync
/usr/sbin/ntp-wait -n 5 -s 3
RETVAL=$?

if [ "$RETVAL" != "0" ];then
echo "Timesync not done, exiting "
exit 1
fi

# do something if clock is in sync

echo "blah! Clock is in sync!"
Fake hardware-clock
RPi has by default enabled fake-hwclock service which does nothing more than saving system time into file (run by hourly crontab and during shutdown) and reading time from that file on startup. When you configure hardware clock, you may want to disable that behaviour although it would be a nice backup ….
# sudo update-rc.d fake-hwclock disableTested with fresh Raspian wheezy installations. No updates were applied and internet connection was present.
If you found this useful, say thanks, click on some banners or donate, I can always use some beer money.